DIY Night Vision Scope: A Step-by-Step Build Guide
Have you ever wondered how to build your own night vision scope? Whether you want it for wildlife watching, security, or just to experiment with electronics, knowing the key steps can make it doable.
By understanding the essential components and assembly process, you’ll be able to create a functional device on your own.
Keep reading for the full step-by-step guide.
Picking Your Build Path: Camera-Based or Intensifier Tube?
Choosing between a camera-based system and an intensifier tube depends on your priorities for night vision. Camera-based setups use digital sensors to capture and display light, offering features like color modes and better tolerance for brighter conditions. However, they tend to have shorter battery life—usually only a few hours before needing a recharge or fresh batteries. Image resolution remains fairly sharp in dusk or moderate darkness, especially when paired with infrared illumination, making them suitable for versatile use. Camera-based digital systems also typically require external IR illumination for identifying distant targets in darkness, as their sensors may struggle with ambient light alone. For those who prioritize raw low-light sensitivity over recording capabilities, a Gen 3 tube provides the clearest images under very low light, such as starlight, without needing active infrared illumination. Understanding how thermal sensors detect heat rather than light explains why these devices function differently in complete darkness. The first practical military night vision goggles were developed during World War II, using early infrared technology to give troops a tactical advantage in darkness.
Intensifier tubes rely on analog photon amplification. Gen 3 tubes, in particular, provide the clearest images under very low light, such as starlight, without needing active infrared illumination. They offer significantly longer battery life because they power fewer electronic components. While their image resolution in near-total darkness typically surpasses digital alternatives, they lack the ability to record video and are less effective in daylight or well-lit environments. The best choice ultimately hinges on whether you prioritize digital features and color or prefer raw low-light performance and longer operational time.
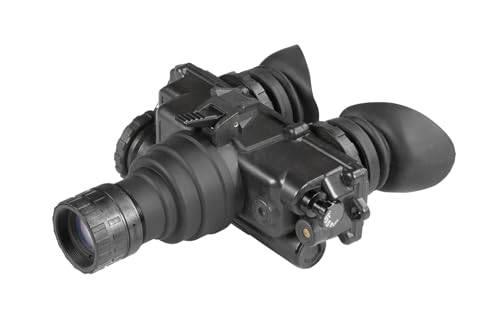
U.S. Military-Grade Night Vision Reliability: Crafted to meet the rigorous demands of the U.S. Military, the AGM PVS-7 night vision goggles deliver unmatched performance and dependability in the field. This rugged, battle-proven device is your trusted companion for secure and precise night operations

AGM PVS-14 is a rugged, multi-purpose night vision monocular used globally in challenging environments.

Enhanced Night Vision Performance: Equipped with a high-performance Gen 3 image intensifier tube, the AGM PVS-14E delivers clear, detailed images in complete darkness for tactical, hunting, and surveillance applications
Parts Checklist for Both Night Vision Build Paths
Both camera-based and intensifier tube systems share a core set of components needed to function properly. First, you’ll need a front objective lens that captures low-light details, crucial for clarity in near darkness. Next, a display stage is essential—either a phosphor screen paired with an eyepiece or a monitor—to view the collected images clearly.
Housing and assembly materials are also common. PVC pipe, epoxy, and black tape help secure components, darken the interior, and protect the system from light leaks. Power options include batteries like AA, AAA, or 12V packs, with enclosures and toggle switches to control power delivery. Wiring and connectors link all components, ensuring stable and reliable operation.
For optical alignment, you’ll need precise housing parts such as couplers and end caps to position lenses and tubes correctly. Standard tools like a drill, Dremel, soldering iron, and multimeter are necessary for cutting, wiring, and measuring. Additionally, having light-gauge hookup wire and fasteners such as epoxy or hot glue helps secure everything without allowing unwanted light intrusion or movement, maintaining the system’s integrity.
How to Remove the IR Filter From Your Camera Sensor
To remove the IR filter from your camera sensor, you first need to identify how it is mounted. The method depends on whether the filter is glued or screwed in place. If it’s glued, you’ll need to break the bond using a sharp blade or heat, as glued filters are typically not durable. For screw-retained filters, remove the retainer screws first with a suitable screwdriver. Before proceeding, disconnect the camera’s power to prevent damage and carefully pry open the housing, being cautious with ribbon cables that connect the internal components. The IR-cut filter sits on the sensor-facing side of the lens assembly. Use fine-tipped tweezers to gently lift it out, but stay mindful of the sensor’s alignment; shifting the glass can result in focus issues. Dust and fingerprints are your enemies here, so clean the area thoroughly before reassembling. Once the filter is removed, you will likely need to refocus the lens, as removing the filter alters the optical path. This modification exposes the CCD sensor to a broader light spectrum, including infrared, enabling specialized photography effects. For a successful build, you should also test the camera’s night vision capability in low-light conditions before final assembly. Unlike a thermal imager, which detects heat signatures rather than reflected light, your modified sensor will still require an external infrared light source to illuminate the scene in total darkness.

Filter Wrench is specially designed for removing jammed or over-tightened filters from your lens. The filter wrench is ideal for detaching all kinds of filters, including UV, CPL, ND, etc

【Infrared Filter】These filters are ideal for creating special affects or for changing the lighting in photography, and also for use in analytical situations where UV and visible light needs to be blocked.
⭐ All-in-One Astrophotography Starter Kit. Includes a 1.25" USB telescope camera and UHC filter—designed to capture clearer deep-sky objects like nebulae and star clusters. A practical bundle for beginners and hobbyists.
Wiring Power, Video, and Signal Wires the Right Way
To wire your camera system correctly, start with power distribution. Your camera typically needs a stable 5V supply, so use a regulated DC-DC converter to step down from a 12V battery or a 1A+ regulator. Make sure to split the positive and negative rails to feed both the camera and display, keeping polarity correct; reversing voltage can damage your tube. For video, isolate the yellow wire as your composite feed. Treat it as a dedicated signal path, avoiding piggybacking it on power lines to preserve signal integrity. Ground everything at a common point, ensuring the video shield is properly tied back. Use JST connectors or screw terminals for modular connections, but keep the video line direct and free from noise for a clear picture. Ensure the camera and screen share a common negative connection by combining their black wires, as indicated in the wiring tips. For instance, using a regulated DC-DC converter also helps maintain consistent voltage output for sensitive components like an image intensifier tube. For best results, choose components based on overall performance and value to match your build. For battery longevity, consider using a lithium polymer battery with sufficient capacity to power both the camera and display for extended flights.

Precision 5V Power Delivery — 4V-30V input to fixed 5V output; 3A continuous / 4A peak current. Direct PCB-mount design for surface-mount or through-hole integration, saving board space in compact embedded systems.

Input voltage: 12/24V (8V-40V),Output: 5V/15A 75W

Input Voltage Range: DC 12V/24V with wide input range of 8V-32V for versatile power source compatibility
Assembling the Housing and Mounting the Optics
Ensure proper enclosure sealing by verifying that all mating surfaces are flush. This prevents stray light from entering and degrading your system’s performance. When installing the eyepiece, insert it into the rear threaded plug and secure it with retaining rings. After inserting the intensifier tube, lock its position using stop rings to keep everything firmly in place. Many commercial kits include O-rings and dielectric grease; apply these to threaded connections to guarantee a light-tight seal. Avoid gaps or misaligned parts, as they can compromise image clarity and system reliability. Before finalizing assembly, check that the springs in the battery compartment are parallel to ensure proper contact. Understanding how game cameras detect movement and capture images in low light can help you apply similar principles to your DIY build. To further improve system sensitivity, consider using a microbolometer sensor to detect heat rather than relying solely on ambient light. Note that commercial night vision goggles typically use image intensifier tubes to amplify existing light, making them distinct from thermal systems.
Focus and Test Your Build in the Dark
To focus and validate your build in the dark, start with focus calibration by repeating adjustments at the same distance each time. Record the final position if possible to ensure consistency. After calibrating, perform darkness validation outdoors in real low-light conditions. Look for clear, sharp images on your actual targets. If the image remains soft, check your power source and mount stability before assuming an issue with the optics. This process ensures your build performs reliably in the conditions it’s meant to handle. Remember that proper focusing is a dynamic process, so regularly recheck and adjust the objective lens as viewing distances change in outdoor environments. For those on a tighter budget, exploring cost-saving tips can help you allocate funds toward higher-quality core components. A key advantage of professional equipment is military-grade durability, which ensures consistent performance in demanding conditions.
Extend Your Range by Adding an IR Illuminator
Adding an IR illuminator can significantly increase your night vision scope’s effective range, especially in low-light conditions. The wavelength you choose impacts both concealment and distance—850 nm light offers a good balance, providing longer reach while remaining relatively covert. In contrast, 940 nm illuminators emit light that is nearly invisible to the naked eye, making them ideal for stealth operations, though they may have a slightly shorter effective range. For extended covert use, models like the Dark Beam IR Flashlight offer a 940Nm wavelength that is critical for stealth. For maximum performance, pairing your illuminator with a high-quality ballistic helmet can ensure stable head-mounted operation. For reliable detection, look for models with night vision that includes high-resolution sensors and adjustable sensitivity. According to recent reviews, the best models combine 850 nm durability with long battery life for extended field use.
Select your beam pattern based on your specific needs. Narrow-beam illuminators focus infrared light into a tight spot, maximizing distance and detail on distant targets. Wide-beam models cast light over a broader area, enhancing close-range visibility and situational awareness. Adjustable-focus illuminators give you the flexibility to dial in the optimal spread for your environment. When mounting an IR illuminator, secure attachment is essential to maintain proper beam alignment. Misaligned units can waste infrared light or illuminate unintended areas, reducing overall effectiveness.
After installation, power on the illuminator and fine-tune the brightness and focus settings to suit actual conditions. It’s important to check performance under typical haze, fog, or reflecting surfaces that you expect to encounter. Carry spare batteries as IR illuminators can drain power faster during extended use, ensuring consistent performance across long sessions.

【940nm IR Flashlight Module】940nm IR LED Light Invisible Module Utilizes the Most Advanced IR BLACK LED with Latest Chip Technology, High Efficiency, Low Thermal Resistance,5 Watt of Optical Power. Emits Night Vision IR Light with 940nm Wavelength, Suitable to Use with a Night Vision Scope, NVS, NVG DIY, Camera Phones, Monocular, Goggles and Camera Which Doesn't Block Infrared Light.(Note: IR Night Vision Flashlight is Not an Ordinary Lumen Flashlight, Don't buy it Wrong)

940nm Infrared Light Wavelength: This ir flashlight emits invisible 940nm IR light, please do use the right night devices that match the 940nm ir light, without the right night vision devices you can't see the infrared light or can't obtain the efficient night vision effects.

【INVISIBLE 940nm Infrared Light】WindFire infrared night vision flashlight emits invisible but high power 850nm Wavelength IR light, NOT Regular Flashlight With White LED. Infrared light is invisible to the human eye. You need professional Infrared Equipment (night vision scope / monocular / infrared cameras / goggles), otherwise you'll think ir flashlight doesn't work!