Can You Use a Thermal Scope During Daylight?
Wondering if you can use a thermal scope during daylight hours? The good news is that thermal scopes are safe to operate in bright sunlight since they detect heat signatures instead of visible light.
However, sunlight can make images appear less contrasty, so you’ll want to adjust settings properly for the best view.
Keep reading to learn how to optimize thermal imaging during the day.
Can You Use a Thermal Scope in Daylight Without Damage?
Yes, you can use a thermal scope in daylight without damaging it. Thermal sensors are designed to detect heat signatures, not visible light, so bright outdoor conditions generally pose no risk to the device. Manufacturers confirm that exposure to sunlight alone isn’t harmful to the sensor. Uncooled thermal sensors are built to withstand a wide range of ambient lighting, further reinforcing their durability in bright conditions. However, you should avoid pointing the objective lens directly at the sun for extended periods. Strong solar energy can stress internal components, so it’s best to refrain from sweeping across the sun or keeping your scope aimed at it for too long. Briefly scanning the sky is safe, but prolonged aiming at the sun can cause damage. Additionally, during midday, you might notice flatter images because background temperatures rise closer to your target’s temperature. This is a change in image performance, not a sign of damage. Thermal units operate independently of visible light, so bright conditions do not interfere with their function. For example, a DIY thermal drone often uses the same uncooled sensor technology that is inherently safe under sunlight. To keep your thermal scope safe, always cap the lens when it’s idle and follow the manufacturer’s guidelines regarding exposure limits.

The Butler Creek Element Scope Caps has taken lens protection to the next level. This modular-interchangeable scope cap can be used in any weather element the hunter is facing
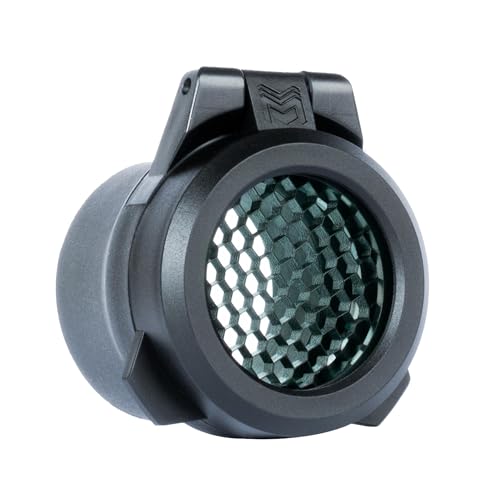
IMPORTANT: Sizing is based on the OUTSIDE diameter of your scope housing. It is NOT based the objective lens diameter of your scope - a 3-9x40mm scope will not fit with a 40mm sized lens cover.
Fabric type: 100 percent Cotton
How Do Thermal Scopes Detect Heat Instead of Reflected Light?
Thermal scopes detect heat instead of reflected light by sensing infrared radiation emitted by objects. Every object above absolute zero releases some level of infrared energy, and thermal scopes use sensors—often microbolometers—that measure these tiny temperature differences. Each pixel in the sensor array detects variations in heat between the target and its background. For example, a warm animal emits more infrared radiation than cooler surroundings, creating a distinct contrast. Understanding thermal imagers helps explain why this technology works without any light source. The sensor converts these heat signals into electrical signals, which are then processed by an onboard computer. This processor constructs a visible image based solely on the temperature variations detected, not on color, reflected light, or external illumination. As a result, what you see through a thermal scope are heat signatures, providing a clear view of living creatures or heat-emitting objects even in complete darkness or through obstructions like smoke or fog.
Why Does Direct Sunlight Reduce Thermal Image Contrast?
Direct sunlight reduces thermal image contrast because it heats the background, minimizing the temperature difference between your target and its surroundings. Sunlight causes soil, rocks, and vegetation to warm up, effectively raising the thermal baseline across the scene. As a result, the temperature differential between the target and background shrinks, making it harder for the thermal sensor to distinguish heat signatures. This leads to a flatter image with fewer visible details. Additionally, sun-heated surfaces create a “thermal bloom” and heat shimmer, which obscure fine features and introduce noise. Shadows also contribute to uneven contrast by producing abrupt hot-and-cold shifts that can confuse pattern recognition. Open fields tend to warm uniformly, further reducing contrast, whereas dense cover offers some thermal differentiation. Overall, direct sunlight hampers your sensor’s ability to clearly detect and isolate heat signatures.

SHOOTING TARGET: Designed with a bullseye target with concentric rings to enhance your precision & target practice.

[HIGH SENSITIVITY DETECTOR]- 256x192 Thermal sensor, 25mm detective lens, 3.5x basic magnification and a 7.0° horizontal field of view allow targets as far as 1422 yards away to be viewed clearly.

High-Resolution Thermal Imaging: Equipped with a 2-inch display and 320240 resolution thermal camera, this scope offers clear heat signatures with real-time 50Hz refresh rate and 3x digital zoom for spotting targets up to 100 meters away
What Settings and Palettes Improve Visibility in Bright Weather?
Bright weather reduces thermal contrast, so adjusting your scope’s brightness and contrast is crucial. Set brightness around 8 out of 20 on a Pulsar, then lower contrast to 2 or 3 out of 20 to minimize background noise from hot surroundings. Recheck these settings as temperature changes occur, since daytime glare can shift the scene balance. For color palettes, stick with Black Hot or White Hot, as they offer high contrast and work well in bright conditions—White Hot especially in midday sunlight. Red Hot can also help with target separation by enhancing contrast between warm objects. Remember to run manual thermal calibration, such as a Non-Uniformity Correction (NUC) or Factory Flat Field Calibration (FFC), to eliminate vertical bars or ghosting caused by bright heat sources. Disabling smoothing filters sharpens the image, making details clearer. Always test different palettes against your specific scene to find the best visibility in bright weather. For instance, if your scope’s internal elevation adjustment is capped, you may need external shimming to compensate for a low impact point that cannot be corrected by the reticle alone. Beginners should also consider using a lens cover to protect the optic from direct sunlight when not actively scanning a target. Since trail cameras and thermal scopes are both field optics, budgeting wisely for a thermal scope follows similar principles of prioritizing essential features over unnecessary extras. Unlike night vision, thermal scopes are not subject to restrictive bans on specific color modes, so you can freely switch palettes in daylight without legal concerns.

Fast Targeting. Wide Field of View: The RattlerV2 19-256 offers a 2.5x base magnification and a wider field of view — ideal for close- to mid-range scanning and fast-moving targets. Whether you’re hunting hogs in thick brush or predators on the move, this thermal scope keeps your target in sight and your response time sharp.

1. Dual-Use Design – Handheld & Rifle Mounted This thermal imaging monocular features a versatile dual-use design. It can be used as a handheld thermal night vision viewer or quickly mounted on a rifle via a Picatinny/Weaver rail, meeting different outdoor observation needs.

Ultra Sensitive Thermal Sensor: cutting-edge thermal scope the ThOR LTV delivers an ultra clear visual with its 12 micron sensor and 60Hz refresh rate, providing a distortion free image
How to Use a Thermal Scope for Hunting, Tracking, and Scouting
To use a thermal scope effectively for hunting, tracking, and scouting, you should understand its ability to detect heat differences even in daylight. Start by performing a non-uniformity correction (NUC) before each use to stabilize the image and ensure consistent performance. When scanning, employ slow, overlapping arcs over feeding zones and travel corridors, pausing 2-3 seconds per field of view to identify subtle heat signatures. For low-light scenarios, choosing between red and green hunting lights can further aid visual identification, though thermal remains the primary tool. Understanding the core sensor technology that converts infrared radiation into an electronic signal helps buyers evaluate model quality and performance.
Mark the last known location immediately when tracking wounded game. Thermal scopes can detect fresh blood heat for 1-2 hours after the animal was hit, helping you follow the trail. Begin with wide-area scans to get a broad view, then zoom in on suspicious heat signatures to confirm your target.
Proper maintenance is crucial: regularly check lens cleanliness, inspect seals for leaks, and ensure your device remains water-resistant, especially during wet conditions like morning drizzles or dewy grass. Zero your scope at 50 yards and always verify your backstop visually before taking a shot. To minimize disturbance, keep lights and sounds off, letting heat signatures guide your approach without alerting game. Understanding ballistic helmet function is also important for head protection in tactical environments, though it does not apply to thermal optics.

【DIY Night Vision Scope System】 Transform daytime optics into a powerful nocturnal tool. This DIY night vision scope upgrade kit is designed for spotting scopes and monoculars. Ideal for nighttime farm perimeter patrols, nocturnal wildlife observation, or exploring outdoors after dark. Adult use only.

Extended Range. Wider Opportunity: With a 25mm Germanium lens and a powerful 3.5x base magnification, the RattlerV2 25-256 gives hunters a serious edge. Its thermal imaging scope lets you detect heat signatures out to 1,250 yards.

ULTIMATE HUNTING BUNDLE: Pairs the AGM Rattler V2 thermal imaging scope with 5 AGM thermal zeroing targets, a Field Boys 10,000 mAh USB-C power bank, a field tripod with scope-to-tripod adapter, and a 14-piece cleaning kit - everything you need to zero fast, stay powered up, glass steady, and keep your optic clear in the field
What Time of Day Delivers the Strongest Thermal Signatures?
The strongest thermal signatures occur during early morning and late evening. These times offer the greatest temperature differences between a target and its background. Before dawn, overnight cooling causes objects to be colder than the terrain, creating sharp contrast. Likewise, late evening sees surfaces losing heat while warm bodies retain it, enhancing thermal separation. This is similar to how low-light devices like the RVM-14 and PVS-14 rely on ambient light rather than thermal contrast for optimal performance. Proper thermal scope sighting techniques ensure the best accuracy during these periods. Unlike the common misconception, thermal cameras cannot see through walls, as they only detect surface heat rather than objects behind solid barriers.
For nighttime security, these periods are ideal because subjects stand out clearly against cooler backgrounds. During midday, solar heating reduces contrast, making thermal signatures weaker. Proper thermal calibration can help mitigate this, and shaded areas or overcast conditions improve visibility. Keep in mind that thermal radiation lags behind the sun’s peak by several hours, so late afternoon might not be as effective as early morning.