What Is Quick Connect on a Stealth Cam?
If you’ve wondered what Quick Connect is on a Stealth Cam, you’re not alone. It’s a handy feature that allows you to control and monitor your camera remotely using the Command Pro app, without needing to physically access the device.
With Quick Connect, you can stream live video, trigger on-demand recordings, update firmware, and confirm your setup with just a few taps.
Keep reading to see how it can make managing your trail camera easier and more efficient.
Understand What Quick Connect Does on Your Stealth Cam
Quick Connect on your Stealth Cam is the setup and control feature that enables Live View or On-Demand Live Stream. You use it through the Command Pro app to trigger remote software updates and start streaming real-time video. This process activates your camera’s core features, such as live streaming for scouting or game tracking. By initiating the activation flow, you instruct the app to send mobile updates directly to your camera over cellular connection, ensuring it has the latest firmware for reliable operation. This on-demand function allows real-time insights with a simple button press. For added protection, you can house the camera in a DIY trail camera security box to prevent theft or tampering in the field. Understanding the cost range of trail cameras helps you budget for this feature effectively.
You don’t need to physically access the camera; instead, you press the Sync button when prompted to complete the setup. This saves trips to check the camera’s aim or view and makes Quick Connect an essential tool for instant setup confirmation. After activation, you can stream live footage or receive photos on demand within seconds, providing immediate insight into your camera’s activity. For nighttime use, understanding the difference between night vision vs. thermal helps you decide which viewing mode best suits your scouting needs in low-light conditions.

The Connect MAX Cellular Trail Camera features an expanded battery capacity, supporting a total of 16 AA batteries (not included). It's also compatible with Stealth Cam’s FieldMAX rechargeable lithium battery cartridges and solar panels for extended use.

Seamless Integration - The Scosche USB QC 3.0 quick connect dashcam hardwire Kit is designed to connect with a variety of dash cameras and USB accessories ensuring a clean, professional installation with easy quick connect accessibility in all vehicles.

FITS: - STEALTH CAM REVOLVER PRO 2.0 360 (3rd Gen.) 360 Degree Cellular Trail Camera. STEALTH Color Is A Close Match To The Camera Color And The Most Popular Choice For This Item. FOR COVERS FOR THE OTHER 360 CAMERA MODELS PLEASE SEE OUR SEPERATE LISTINGS. - MADE IN THE USA -
Which Stealth Cam Models Support Quick Connect and Live View?
Quick Connect and Live View are supported only on a select group of high-performance Stealth Cam models. Specifically, the Deceptor MAX, Revolver Pro, Deceptor MAX 2.0, and Revolver Pro 2.0 support these features. For those seeking the best value, these models are among the top affordable trail cameras that balance quality and performance. The Revolver Pro models also offer a unique 360-degree live streaming experience. For clear low-light observation, these models incorporate affordable night vision technology comparable to leading budget devices. Users should follow a step-by-step setup guide for optimal configuration of these advanced camera settings.
Not all compatible cameras will have Quick Connect activated by default. You need to enable it and update the camera software via the Command Pro app before Live View functionality is available. Additionally, each camera requires its own Live View add-on plan, with a free 60-minute first activation included.
Older or non-flagship cellular models are not listed as compatible with Quick Connect and Live View. Make sure to verify your specific model before making a purchase to avoid spending time on setup that won’t work. The Stealth Cam Connect Wireless Trail Camera features an automatic network coverage function that selects the strongest AT&T or Verizon signal for consistent transmission.
How to Enable Quick Connect During Camera Setup
Enabling Quick Connect during camera setup begins with the Command Pro app and a properly prepared camera, before you even press the SYNC button. Start by creating your Stealth Cam account within the app and purchasing a cellular data plan. Before powering on the camera, install the battery tray, insert a Class 10 SD card of 32 GB or less, and hand-tighten the antenna to ensure a water-tight seal against weather. For consistent performance, upgrade to rechargeable lithium-ion batteries for longer field life. Turn the camera on, then open the app, select your camera from the device list, and follow the setup prompts. Understanding how night vision cameras detect light in low-light conditions can help you choose the best placement for optimal image capture. When prompted, press the SYNC button on the camera. The camera will flash sequentially while pairing to your account, which can take several minutes depending on signal strength. For best results, perform the setup at a location with strong service, such as your home or camp, considering where you’ll ultimately place the camera. After the sync process completes, verify success by checking for a test image upload in the app. For advanced users, building your own thermal scope may offer greater customization for nighttime surveillance needs. When selecting a camera for low-light monitoring, remember that thermal cameras capture heat signatures rather than visible light, offering a different detection method than standard night vision.

DON'T MISS THE ACTION - With a long-reaching 80ft detection & IR flash range, this trail hunting camera delivers broad coverage & enhanced visibility; The 0.35-second trigger speed takes 1 to 6 images per trigger to ensure you never miss fast-moving game

DON'T MISS THE ACTION - With a long-reaching 80ft detection & IR flash range, this trail hunting camera delivers broad coverage & enhanced visibility; The 0.35-second trigger speed takes 1 to 6 images per trigger to ensure you never miss fast-moving game
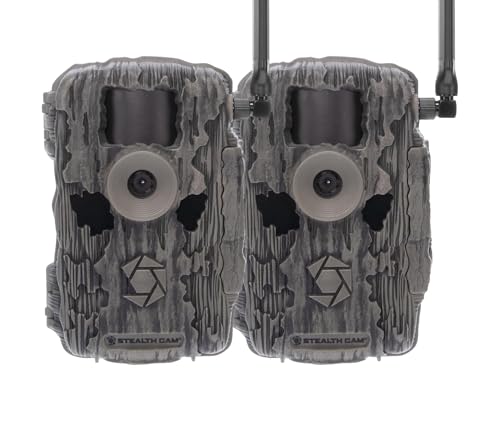
SUPERIOR QUALITY - Featuring 36MP photo resolution, 720p video resolution with a Burst Mode of 1-2 images per triggering, and a 80ft Detection range, the Stealth Cam Fusion X-Pro trail camera is the excellent choice for hunters who demand the most from their cellular trail cameras.
Activate Live View in the Command Pro App
To activate Live View in the Command Pro app, start by adding your camera and selecting a data plan within the app. Once you’ve completed these steps, you can enable Live View directly from the camera’s card. Tap the drop-down arrow on the card and then select Live View. The app will prompt you to enable Quick Connect and purchase a plan if you haven’t already. Your first activation grants you 60 minutes of free Live View streaming. For users weighing their optics options, thermal monoculars provide a more compact and cost-effective alternative to binoculars for scouting tasks. A DIY approach to building your own night vision camera can also be achieved by sourcing essential tools and parts like infrared LEDs and a camera sensor. Ballistic helmets are designed to stop projectiles by absorbing their kinetic energy, which is crucial for impact resistance in high-risk environments.
During setup, ensure the camera is properly positioned for the best signal strength. The app will ask the camera to perform a remote update via cellular data. If your signal is weak, multiple sync attempts may be necessary to complete the update. When prompted, press the camera’s Sync button to finish the update. After the update is complete, Live View will be ready and will stream video directly within the app. Keep in mind that any unused minutes will expire after thirty days. This feature is best paired with external battery sources like rechargeable solar packs for extended use.

UNMATCHED CLARITY: With a high IR resolution of 384x288 and a smooth 50Hz refresh rate, the thermal monocular provides vivid thermal images, capturing every detail of your surroundings with precision.

UNMATCHED CLARITY: With a high IR resolution of 256x192 and a smooth 50Hz refresh rate, the thermal monocular provides vivid thermal images, capturing every detail of your surroundings with precision.

Day or Night Viewing - Capture video in both daytime and nighttime modes. Store files directly to a microSD card for easy viewing and sharing.
Troubleshoot Common Quick Connect Issues
Checking your sync status is the first step if your Quick Connect isn’t working. Tap the Sync button below the battery tray and decode the LED patterns using the sticker. A solid red Battery LED means there’s no SD card inserted, the power is too low, or the card is too large. A red Network LED indicates a loose SIM card or weak signal. A red Account LED points to an inactive or missing account. Addressing these issues can often resolve connection problems quickly. For optimal capture, place the camera at waist level where animals are likely to walk, ensuring the center horizontal line is maintained. Building a DIY thermal drone requires expanding your part sourcing beyond standard camera equipment, including a thermal imager for target detection. However, unlike optical cameras, thermal scopes cannot see through solid walls because they only detect surface heat.
Field issues can look like connection failures but are often caused by camera placement or environmental factors. If your camera is aimed too high or low, it might miss capturing game. Tall grass or moving brush can trigger false images that flood your SD card and slow down uploads. These phantom photos fill storage quickly, causing delays and confusing your sync process.
Before trying to connect again, clear the area of vegetation, reposition the camera for a clear line of sight, and ensure it has stable power. Use a fresh SD card when testing the sync. If problems persist, verify that your account is active through the web portal and confirm your payment method is current to avoid account-related issues. For a reliable connection, consider the step-by-step DIY tips for integrating radio telemetry hardware.
Battery and Data Plan Requirements for Quick Connect
To activate your data plan for Quick Connect, you need an active cellular plan linked to your camera’s SIM card. Without it, the network indicator will stay solid red, and remote image transmission will be unavailable. However, the camera can still store photos locally on the SD card. Before using Quick Connect, verify that your batteries are fresh, your SD card is valid and properly inserted, and your data plan is active and correctly configured with your carrier. Combining power sources provides additional backup options to ensure continuous operation. Without an active cellular plan, the camera will function as a traditional trail camera, capturing images only to the SD card. Ensuring these elements are in place will enable a smooth connection process. To maintain optimal performance, you should also periodically format the SD card within the camera to prevent file errors.
Optimize Quick Connect Performance for Faster Remote Access
Switching your DNS to a faster public service, like Google DNS or Cloudflare DNS, can significantly reduce name-resolution delays. When QuickConnect fails to resolve your local network due to blocked DNS lookups, it often falls back on relay servers, causing substantial slowdowns. After making the change, restart your network equipment to ensure the new settings take effect. Confirm that your camera and app are updated, as newer versions often include connection optimizations. Some camera models, such as the Tactacam Reveal 3.0 vs. Pro, benefit from firmware updates that improve network handshake speeds. Finally, test your setup from outside your Wi‑Fi network to verify you’re connecting through a direct, high-speed route. Avoid relying on relayed connections; a few adjustments can make Quick Connect feel instant. Choosing a camera with a direct cellular connection avoids the slow relay fallback common in some budget models. Understanding night vision goggle prices can help you allocate budget for faster network upgrades rather than costly relay server subscriptions.