Build Your Own Thermal Imaging Drone: A DIY Guide
Want to build your own thermal imaging drone without breaking the bank? For around $500, you can put together a functional setup that gives you thermal visuals but with some trade-offs in clarity and flight time.
With the right components and basic wiring, you’ll be able to get a good balance between cost and performance. Keep reading to see how you can do it yourself.
What a DIY Thermal Drone Can (and Can’t) Do for $500
At $500, your DIY thermal drone will have significant limitations. The thermal resolution will likely be low-end, around 256-class analog sensors, resulting in grainy and blurry images. This makes it difficult to distinguish small or subtle hot spots, reducing the usefulness for detailed inspections. Additionally, the extra weight of the thermal payload drains your battery faster, leading to shorter and less predictable flight times. Expect basic scouting and inspection capabilities, but don’t anticipate professional-grade clarity or endurance. Every dollar spent pushes you further into compromises, so your build will suit hobby exploration more than serious or commercial missions. These cameras offer a 55° field of view thanks to a 4-mm lens, improving usability for basic detection over older narrow-angle modules.

High-Resolution Thermal Imaging: This FPV thermal camera module is available in multiple resolutions (256, 384, 640) to deliver clear and detailed thermal vision, allowing for precise identification of heat signatures during flight.

[Advanced Thermal Precision] Features a highly sensitive infrared sensor with multiple resolution options (up to 640x512), providing clear thermal signatures for industrial inspection and nighttime navigation.

Thermal imaging camera for drone use, suitable for replacing or configuring the imaging unit for aerial viewing tasks.
DIY Thermal Drone Camera: Budget vs. Image Quality Trade-Offs
The main trade-off when building a budget-friendly DIY thermal drone camera is between resolution and overall image quality. A 160×120 thermal sensor is affordable but offers limited detail, making it suitable for basic inspections. Upgrading to a 256×192 sensor improves resolution yet still struggles with sensitivity, especially if the sensor’s NETD exceeds 80 mK, which reduces its ability to detect subtle temperature differences. Choosing a lower-cost 256-pixel sensor with a wide 20° field of view makes covering ground more challenging, as its coverage area decreases while detail gain is limited. Conversely, a higher-resolution sensor with better sensitivity, such as one with 384 pixels and a 30° field of view, balances coverage and detail but comes at a higher cost. Keep in mind that affordability constraints under around $500 often mean compromising on stabilization and sensor quality, which impacts data reliability and footage clarity. However, a pre-built thermal drone like the Autel Evo Lite 640T Enterprise offers a 640 resolution thermal sensor and 4K daytime camera for under $4,000, providing high-end features without the DIY trade-offs. For securing your drone equipment during transport, a cable lock can prevent theft of sensitive components. To manage your overall project expenses, it is wise to compare the cost of a trail camera against the price of individual thermal modules, as this helps you avoid overpaying for redundant components. Additionally, understanding how night vision bugs appear can help you distinguish between sensor artifacts and real environmental interference, improving your footage analysis.

Equipped with compact three-axis gimbal for stable shooting during drone flight

Unmanned Aerial Vehicles (UAVs)
Unmanned Aerial Vehicles (UAVs)
Essential Parts for a DIY Thermal Drone and Where to Cut Costs
Using an off-the-shelf frame is your best bet for a budget thermal drone. It keeps costs low and is safer than trying to modify or build your own from scratch. Focus your spending on electronic components that ensure stable flight—such as a trustworthy flight controller like the Matek F405 VTOL—and pair it with midrange motors and ESCs. Cutting corners here can lead to failures that risk losing your entire payload, which makes reliability worth the extra bucks. For example, a carbon fiber frame like the Hollybro X500 V2 with pre-installed motors and ESCs simplifies assembly while providing heavy-lift stability for your camera payload. When comparing your options, remember that night vision vs. thermal technologies serve different purposes, so choose the sensor type that best matches your mission. Understanding thermal imaging basics helps you select the appropriate sensor resolution for your specific detection needs. Understanding the PIR sensor impact on game cameras helps you avoid false triggers that drain battery life and fill memory cards with irrelevant footage.
The thermal camera is the biggest expense. You can save money by opting for a lower-resolution sensor if basic heat detection is enough for your needs. However, calibrating the thermal sensor remains critical; improper calibration leads to inaccurate heat readings. When integrating the payload, make sure your drone’s power system can handle the current draw of the camera. To further cut costs, omit the DVR and use a simple 5.8 GHz video transmitter instead. Prioritize flight stability over high-end camera features to build a functional, cost-effective thermal drone.

Carbon fiber frame: 2.5mm ultra-thin carbon fiber bottom plate + top plate for both strength and

550mm Compact Folding Quadcopter Frame Kit.
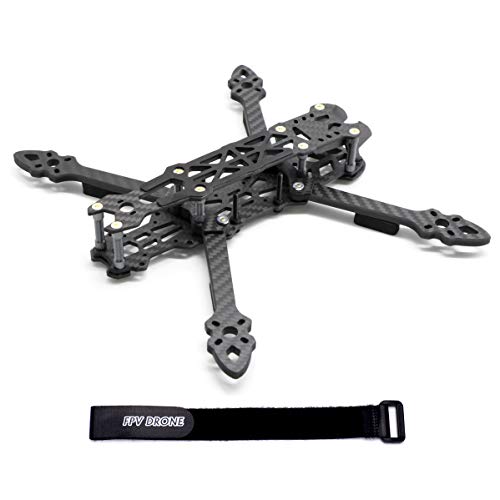
High quality 3K carbon fiber plate, high CNC processing.
3D-Printed Mounts and Rubber Washers: Keeping the Camera Stable on a Budget
Using a 3D-printed mount combined with rubber washers or foam tape can keep your thermal camera stable on a budget. Opt for TPU filament for the mount because it flexes, providing natural vibration damping and shock absorption. Rigid materials like PLA work for prototypes, but TPU handles fit errors better because of its flexibility. Note that standard iPhones lack a built-in thermal sensor, so using an external thermal camera module is required for this build. For those preferring a commercial shortcut, a dedicated thermal camera can also be purchased pre-assembled. Understanding the key price drivers like sensor resolution and housing materials helps you choose a module that fits your budget without overspending.
Add 1 mm soft foam tape at every contact point to prevent micro-movements and reduce wear. Placing rubber washers between the mount and the frame increases friction and further cuts down vibration transfer. Custom-cut holes for ports and buttons ensure your camera remains fully functional.
For extra security, attach a Velcro strap as a secondary retainer to prevent shifting during flight. This setup offers reliable stability without the need for expensive commercial hardware.
How to Wire Up Video: Switchers, Recorders, and FPV Transmitters Explained
To wire your thermal drone’s video system, follow a straightforward path: connect your thermal camera output to a switcher or flight controller, then to the VTX, and finally to your goggles or monitor. Each connection requires only a few core lines. The thermal camera’s composite video (CVBS), ground, and power wires should be connected to the video switcher, which allows you to toggle between thermal and visible feeds in-flight. The Axis Flying 256 thermal camera, for instance, has a narrow 18° FOV that limits its usability as a primary navigation camera. For setups with dual cameras, feed each camera’s output into separate analog recorders for simultaneous capture. The switcher then sends your selected live video feed to the VTX. The VTX itself needs to be wired for video input, ground, and power, after which it broadcasts the signal to your ground receiver. Thermal imaging relies on infrared radiation to detect heat signatures, which is the same electromagnetic wave principle used by night vision goggles. Always verify the polarity and voltage of your wiring to avoid damaging components. Keep any unused control wires disconnected to ensure a clean, reliable analog FPV chain. When choosing a thermal camera for this build, consider performance and cost trade-offs to match your specific flight requirements. To save on your build, pay close attention to video switcher costs, as selecting an affordable model can significantly reduce total expenses.

3-Channel Control - This FPV video switcher module features a highly efficient 3-channel design that allows you to switch between different video sources quickly. With PWM control signals ensuring and stability, users can enjoy a seamless experience. This cutting- technology guarantees accurate transmission, freeing you from dropouts and unwanted interruptions during your sessions.

Type:2CH Video Switcher Module

Model FOXEER 2CH Video Switcher designed for RC FPV drone applications ensures switching between two video sources with minimal latency
Power Distribution and Flight Controller Setup for Thermal Drone Builds
To ensure stable power delivery for your thermal drone, you should use a 6S Li-Po battery pack with a nominal voltage of 22.2 V. This voltage level provides a good balance between power and flight time, supporting high-current propulsion needs while allowing for efficient voltage regulation. From this main supply, you step down the voltage using DC-DC buck converters to provide clean, regulated power rails suited for different electronics. A dedicated low-dropout regulator supplies a stable 5 V line specifically for your thermal camera core, avoiding shared BECs that might introduce noise. This separation prevents motor current fluctuations from affecting the sensitive imaging system. Additionally, placing low-ESR bypass capacitors—such as a 10 µF tantalum paired with a 0.1 µF ceramic capacitor—close to the camera input significantly reduces motor noise and helps prevent vertical banding artifacts in the thermal images. This approach mirrors the noise isolation techniques used in night vision cameras to protect sensitive imaging sensors from power supply interference. Just as with thermal cameras, a properly designed cantilever scope mount can prevent mechanical vibrations from corrupting the optical alignment of sensitive imaging payloads. For optimal performance, your build should also prioritize a bump helmet for head-mounted display viewing during flight, ensuring comfort and stability.
Calibrating the Thermal Camera and Testing Before You Take Off
To ensure your thermal camera is properly calibrated before takeoff, you need to perform a series of precise steps. First, allow your sensor to warm up to its operating temperature, typically for about 15-30 minutes, to account for any temperature drift. Use a blackbody reference or known targets—such as a piece of electrical tape with high emissivity—to perform multi-point checks across the temperature range you expect to measure. Set the emissivity value correctly—use high-emissivity materials like electrical tape for consistency—to ensure accurate readings. Different types of night vision goggles exist, but for thermal imaging on a drone, focus on radiometric calibration requirements for accurate temperature measurement. Understanding how pricing factors affect equipment choices can help you budget for a reliable thermal camera. A beginner’s understanding of thermal clip-ons can also help you evaluate how external optics affect calibration stability.
For field verification, test your camera with boiling water, which should read near 100°C, and melting ice, close to 0°C. Make sure to avoid condensation on the lens during hot-water checks, as this can skew your readings. Since there is no fixed interval for calibration checks, you should repeat these field tests regularly based on your operational needs to maintain accuracy. Check the image uniformity across the entire detector array by examining the image for any patches or irregularities. Adjust the level and span controls on your camera until the image is evenly distributed and details are clear.
Before your actual flight, perform a final calibration using the same optics and settings intended for flight to confirm that everything responds within your camera’s specified accuracy window. Recalibrate immediately if you notice any drift in the readings or if you change the lens. Only when your thermal camera consistently reads within its certified accuracy range can you confidently proceed with your flight operations.
DIY Thermal Drone Cost Breakdown: $500 Budget vs. £850 Build
The DIY thermal drone options break down into two main builds: a $500 budget version and an £850 more capable system. The $500 build involves repurposing an older drone frame and pairing it with a basic 256-pixel thermal sensor, which costs around $200 to $300. The non-thermal hardware—motors, flight controller (FC), and battery—easily stays under $250, leaving most of your budget for the sensor itself. This setup offers a functional thermal drone at a low cost but with limited resolution and thermal clarity. While budget sensors rely on simple microbolometers, game cameras detect heat using an array of pixels that convert infrared radiation into an electrical signal, just like more advanced thermal modules. For a DIY builder, protecting this sensor in a waterproof enclosure is also critical to ensure long-term durability in outdoor conditions.
The £850 build upgrades to a higher-resolution thermal sensor and a more robust drone frame. This results in better image quality, making it more suitable for night vision, multispectral applications, and detailed thermal analysis. It also tends to be more durable and reliable in the field. While the initial cost is higher, the improved performance makes this option a better investment if you need clearer thermal data. Compared to commercial options like the Mavic 3T, both DIY builds are affordable alternatives that significantly reduce costs without sacrificing essential thermal capabilities.